 Pin this
 Transform simple vanilla cake into an enchanting bunny-shaped masterpiece that brings whimsy to any spring gathering. The moist layers pair perfectly with creamy buttercream, while shredded coconut adds delightful texture mimicking soft fur. This showstopping dessert emerges from humble ingredients—flour, butter, eggs, and vanilla—yet delivers impressive results that delight both children and adults.
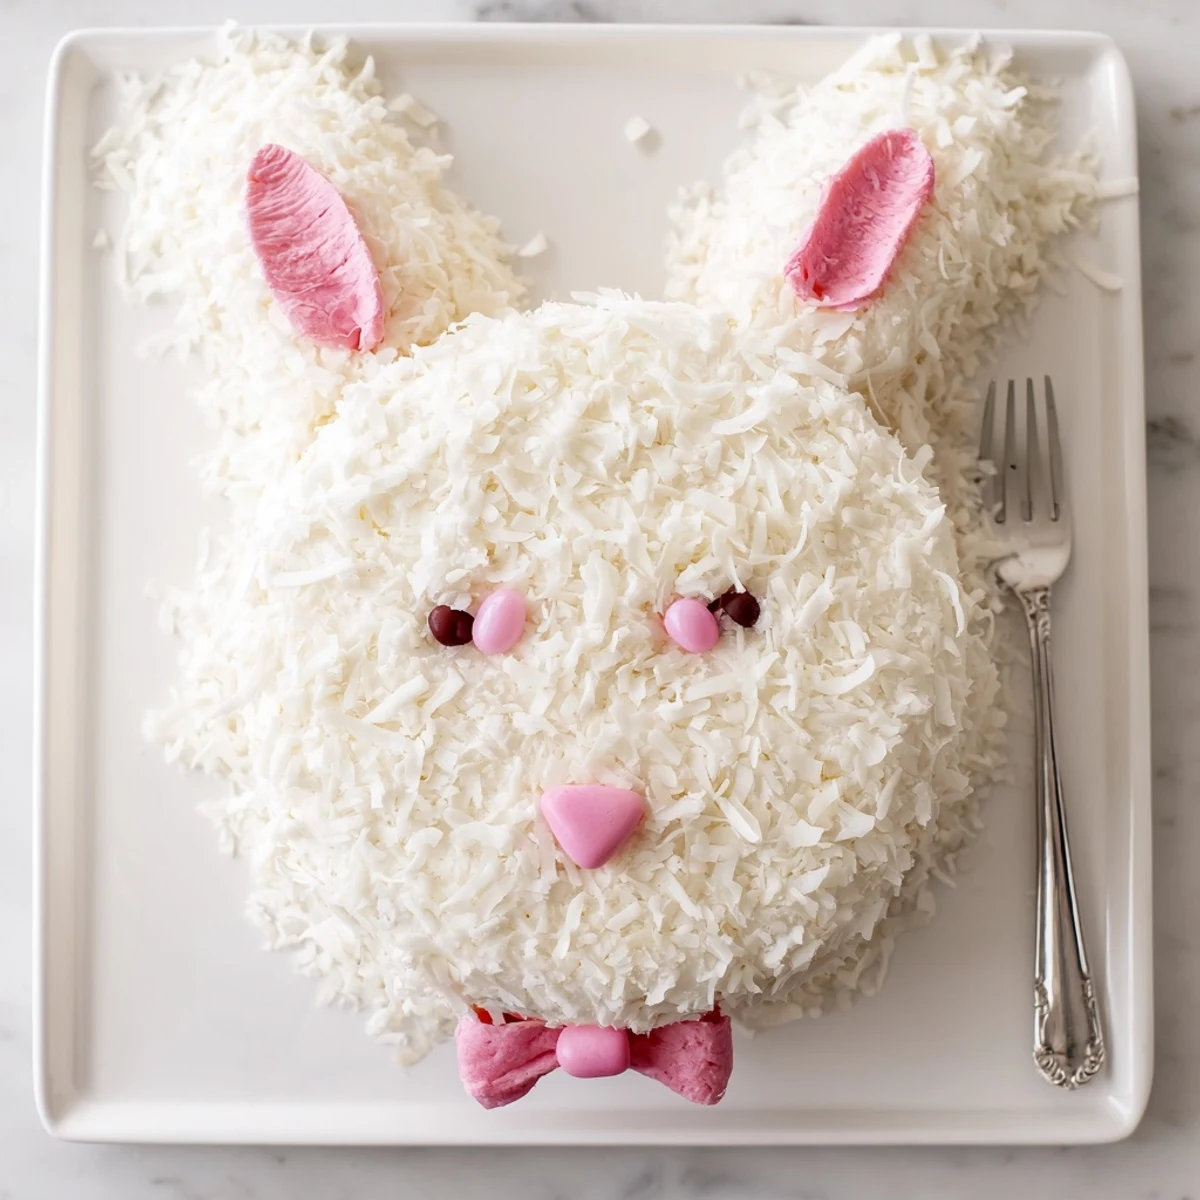
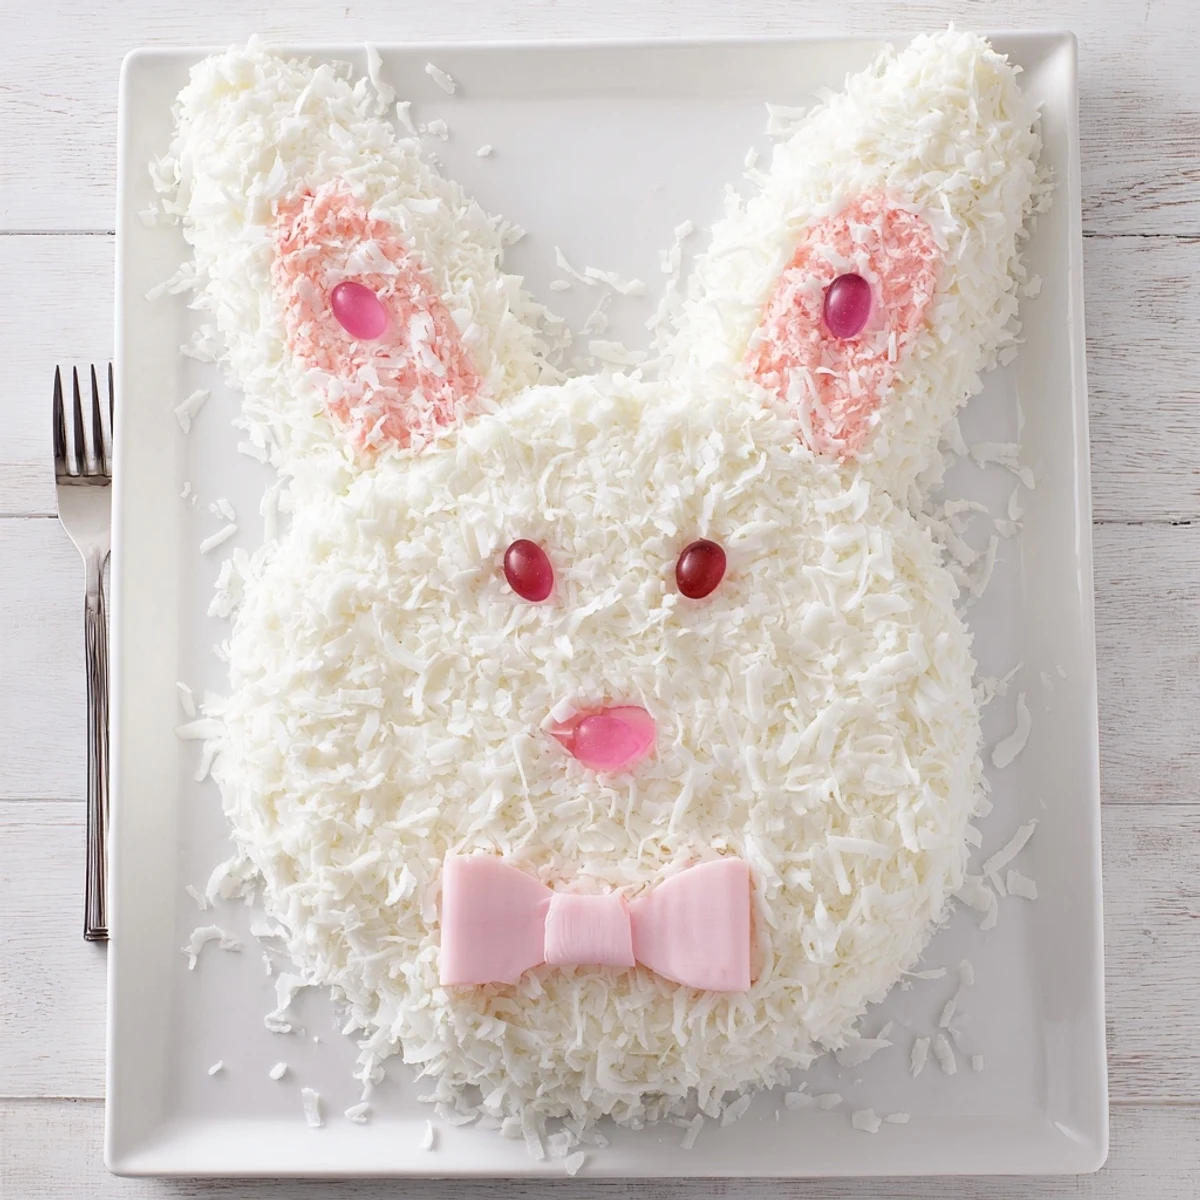
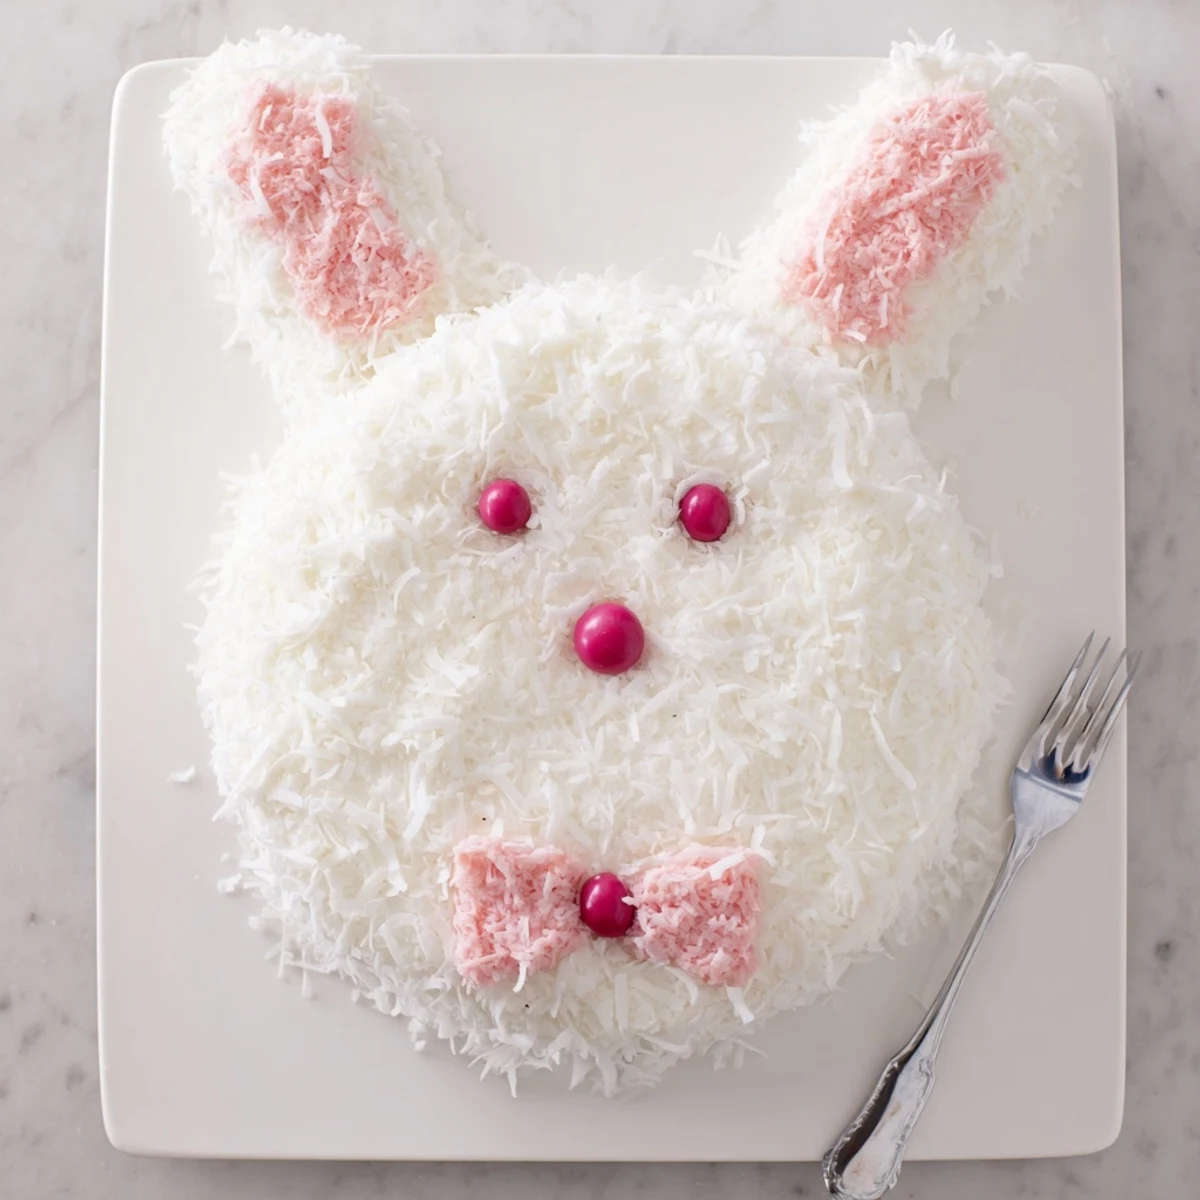
The assembly process invites creativity: arrange cake rounds into face, ears, and bow tie before coating with generous frosting. Press coconut over the surface for instant fur effect, then add personality with pink-tinted inner ears, candy eyes, and a jellybean nose. The final creation tastes as wonderful as it looks, making it ideal for Easter brunch, baby showers, or birthday celebrations.
Preparation remains accessible for home bakers, requiring just over an hour from start to finish. The method works beautifully with chocolate cake base or store-bought frosting shortcuts when time presses. Each serving delivers comforting sweetness with 410 calories, perfect alongside afternoon coffee or as a grand finale to holiday meals.
The first time I attempted a bunny cake, my kitchen looked like a coconut explosion. I was making it for my nieces Easter brunch, and somewhere between cutting the ear shapes and trying to get the pink coconut just right, I realized edible glitter is not the same as the craft kind. The kids still loved it, but I learned that the charm of this cake is in its slightly imperfect, fuzzy personality.
Last spring, my neighbor asked me to make one for her daughters birthday. I arrived with the bunny cake balanced on my front seat the whole way, and when I walked in, the birthday girl literally gasped. Her mother told me later that she kept asking if we could cut the bunnys ears, and I laughed because that was exactly the kind of problem you want at a party.
Ingredients
- 2¼ cups all-purpose flour: This foundation creates a tender crumb that holds up beautifully when you cut and reshape the cake into bunny parts
- 1½ tsp baking powder: Gives the cake just enough lift without making it too airy to handle during the shaping process
- ½ tsp baking soda: Works with the buttermilk or milk to create a fine, even texture thats perfect for carving
- ½ tsp salt: Balances the sweetness and enhances all the vanilla notes
- 1 cup granulated sugar: I learned not to reduce this because the structure depends on it for the best cutting results
- ½ cup unsalted butter, softened: Room temperature butter creates the perfect creamed base for a moist, sturdy cake
- 3 large eggs: These provide structure and richness that keeps the cake from crumbling when you assemble the bunny
- 1 cup whole milk: Full fat milk makes a noticeably more tender cake that withstands the shaping process
- 2 tsp vanilla extract: Pure vanilla extract is worth it here since the flavor profile is simple and classic
- 1 cup unsalted butter for frosting: High quality butter makes the frosting taste like something from a bakery
- 4 cups powdered sugar, sifted: Sifting first prevents those annoying lumps that ruin smooth frosting
- 2–3 tbsp milk: Adjust this to get exactly the spreading consistency you prefer
- 1 tsp vanilla extract for frosting: Dont skip the vanilla in the frosting, it makes all the difference
- Pinch of salt: A tiny bit of salt in frosting cuts the sweetness and makes it taste professionally balanced
- 2 cups shredded sweetened coconut: Sweetened coconut creates that adorable fuzzy look and tastes wonderful with vanilla
- Pink food coloring: Gel coloring works better than liquid for tinting coconut without making it soggy
- Jelly beans or mini candies: These become the expressive eyes and nose that give your bunny its personality
- Pink and white fondant or marshmallows: Fondant gives cleaner ear details, but marshmallows are easier and taste just as cute
Instructions
- Get your oven ready:
- Preheat oven to 350°F and generously grease two 8-inch round pans with butter, then dust with flour for guaranteed easy release
- Whisk the dry team:
- In a medium bowl, combine flour, baking powder, baking soda, and salt, whisking them together thoroughly so theyre evenly distributed
- Cream butter and sugar:
- Beat softened butter and sugar in a large bowl until pale and fluffy, which takes about 3 to 5 minutes of honest mixing
- Add eggs one by one:
- Beat in eggs individually, letting each one fully incorporate before adding the next, then stir in the vanilla
- Combine everything gently:
- Alternate adding the flour mixture and milk, starting and ending with flour, mixing only until just combined to avoid tough cake
- Bake the rounds:
- Divide batter evenly between pans and bake 22 to 25 minutes until the tops spring back when lightly touched
- Cool completely:
- Let cakes rest in pans 10 minutes before turning onto wire racks, and wait until fully cool before attempting any cutting
- Make the frosting:
- Beat butter until smooth, then gradually add powdered sugar, vanilla, salt, and just enough milk for spreadable perfection
- Shape your bunny:
- Keep one cake whole for the face, cut the second into two oval ears, and trim the remaining center into a bow tie
- Arrange on the tray:
- Position the face, ears, and bow tie on your serving platter before frosting, moving pieces until you love the bunny shape
- Add the crumb coat:
- Spread a thin layer of frosting over everything and chill 20 minutes, which locks in crumbs and makes the final layer gorgeous
- Frost and add fur:
- Apply the final frosting layer, then press coconut all over, working in sections and patting gently to make it stick
- Create pink ears:
- Tint a handful of coconut with pink food coloring and carefully press it onto the inner ear sections for that adorable detail
- Bring your bunny to life:
- Add fondant or marshmallow ears, then place jelly beans for the nose and eyes, stepping back occasionally to check the expression
 Pin this
 My sister called me after making this cake herself, slightly panicked because she cut the ears at an odd angle. I told her to just frost it anyway and call it artistic, and she sent me a photo of the most endearingly lopsided bunny I have ever seen. Her kids declared it the best cake ever, which taught me that people remember the joy more than the perfection.
Making Ahead
Bake the cake layers up to two days before and wrap them tightly in plastic at room temperature. The frosting can be made ahead and stored in the refrigerator, then brought to room temperature and beaten smooth again before using.
Storage Secrets
Once assembled, this cake is best enjoyed within 24 hours because the coconut can soften in the frosting. If you must store it, keep it in a cool spot away from direct sunlight, covered loosely with a cake dome.
Serving Suggestions
This cake makes a stunning centerpiece for any spring gathering. I love serving it alongside fresh fruit or light citrus desserts to balance the sweetness. A glass of cold milk or sparkling lemonade complements it perfectly.
- Use a large sharp knife warmed in hot water for the cleanest slices through all that coconut
- Photograph it from above to capture the full bunny shape before cutting
- Have extra coconut handy for touching up any bare spots that appear during serving
 Pin this
 There is something so joyful about cutting into a cake shaped like a bunny and watching people reach for the ear pieces first. Make this cake when you want to create a moment that everyone will remember.
Recipe Questions & Answers
- → How far in advance can I make the bunny cake?
-
Prepare the cake layers one day ahead and wrap tightly in plastic. Store frosted cake at room temperature for up to 2 days or refrigerate for 4 days. Bring to room temperature before serving for the best texture and flavor.
- → Can I freeze the bunny cake for later?
-
Freeze unfrosted cake layers wrapped in plastic and foil for up to 3 months. Thaw overnight at room temperature before frosting and decorating. Already frosted cake freezes well for 1-2 months—place in the freezer uncovered until firm, then wrap tightly.
- → What's the best way to cut the bunny shape?
-
Keep one 8-inch round whole for the face. Cut the second round lengthwise into two oval shapes for ears, leaving a bow-tie-shaped center piece. Use a serrated knife and gentle sawing motions for clean edges. Arrange pieces on your serving tray before frosting to ensure proper placement.
- → Can I make this without fondant?
-
Absolutely! Use large marshmallows sliced in half for the inner ear details, or simply press pink-tinted coconut directly onto the frosted ears. Candy buttons, chocolate chips, or licorice pieces work beautifully for facial features without requiring fondant work.
- → What other cake flavors work well?
-
Chocolate cake creates a striking contrast with white coconut fur. Lemon, carrot, or strawberry cakes capture spring flavors beautifully. Spice cake with cream cheese frosting offers a cozy variation. Any sturdy cake that holds its shape during cutting works perfectly for this design.
- → How do I transport the bunny cake safely?
-
Assemble and decorate the cake directly on your serving platter or a sturdy board covered in foil. Carry with both hands supporting from beneath, or place in a large box with nonslip mat. Avoid placing in a warm car for extended periods as buttercream may soften.
